
Amazon EKS Workshop Study 2기
8주차
EKS IaC ( Terraform )
eks 환경을 테라폼으로 구성해보기
실습환경 구성
윈도우에서 구성하려면 mac 환경에서보다 이것저것 해 줘야할 게 많다. brew 짱짱맨..
wsl2 설치 > 실행 > 테라폼 설치
wget -O- https://apt.releases.hashicorp.com/gpg | sudo gpg --dearmor -o /usr/share/keyrings/hashicorp-archive-keyring.gpg
echo "deb [signed-by=/usr/share/keyrings/hashicorp-archive-keyring.gpg] https://apt.releases.hashicorp.com $(lsb_release -cs) main" | sudo tee /etc/apt/sources.list.d/hashicorp.list
sudo apt update && sudo apt install terraform

# 테라폼 버전 정보 확인
terraform version
https://www.how2shout.com/linux/how-to-install-eksctl-cli-tool-on-ubuntu-linux/
How to Install eksctl CLI tool on Ubuntu Linux
Using eksctl, users can easily deploy and scale containerized applications on AWS. Here we learn how to install eksctl on an Ubuntu system.
www.how2shout.com
시스템 업데이트
sudo apt update
AWSCLIL 설치
sudo apt install awscli

#자격증명
aws configure
EKSCTL 설치(amd64기)
curl --silent --location "https://github.com/weaveworks/eksctl/releases/latest/download/eksctl_$(uname -s)_amd64.tar.gz" | tar xz -C /tmp
바이너리 파일 위치 이동
sudo mv /tmp/eksctl /usr/local/bin
설치 확인
eksctl version
eksctl --help
KUBECTL 설치
curl -O https://s3.us-west-2.amazonaws.com/amazon-eks/1.29.3/2024-04-19/bin/linux/amd64/kubectl
chmod +x ./kubectl
mkdir -p $HOME/bin && cp ./kubectl $HOME/bin/kubectl && export PATH=$HOME/bin:$PATH

#확인
kubectl version --client
HELM 설치
기존의 바이너리 파일 설치부터하는 방법도 있는데, 공식 인스톨러 스크립트가 있다니 그것을 사용
https://helm.sh/docs/intro/install/
Installing Helm
Learn how to install and get running with Helm.
helm.sh
curl -fsSL -o get_helm.sh https://raw.githubusercontent.com/helm/helm/main/scripts/get-helm-3
chmod 700 get_helm.sh
./get_helm.sh
+) third party 를 사용한 방법(apt)
curl https://baltocdn.com/helm/signing.asc | gpg --dearmor | sudo tee /usr/share/keyrings/helm.gpg > /dev/null
sudo apt-get install apt-transport-https --yes
echo "deb [arch=$(dpkg --print-architecture) signed-by=/usr/share/keyrings/helm.gpg] https://baltocdn.com/helm/stable/debian/ all main" | sudo tee /etc/apt/sources.list.d/helm-stable-debian.list
sudo apt-get update
sudo apt-get install helm
테라폼 실습을 위한 디렉토리
mkdir learn-terraform
cd learn-terraform
touch main.tf
Amazon Linux 2 최신 ami id 찾기
#aws ec2 describe-images --owners self amazon
aws ec2 describe-images --owners amazon --filters "Name=name,Values=amzn2-ami-hvm-2.0.*-x86_64-gp2" "Name=state,Values=available" --query 'Images|sort_by(@, &CreationDate)[-1].[ImageId, Name]' --output text
ami-0217b147346e48e84   amzn2-ami-hvm-2.0.20240412.0-x86_64-gp2

aws ec2 describe-images --owners amazon --filters "Name=name,Values=amzn2-ami-hvm-2.0.*-x86_64-gp2" "Name=state,Values=available" --query 'Images|sort_by(@, &CreationDate)[-1].[ImageId]' --output text
ami-0217b147346e48e84

AL2ID=`aws ec2 describe-images --owners amazon --filters "Name=name,Values=amzn2-ami-hvm-2.0.*-x86_64-gp2" "Name=state,Values=available" --query 'Images|sort_by(@, &CreationDate)[-1].[ImageId]' --output text`
echo $AL2ID
ec2 생성 모니터링
# [터미널1] EC2 생성 모니터링
export AWS_PAGER=""
while true; do aws ec2 describe-instances --query "Reservations[*].Instances[*].{PublicIPAdd:PublicIpAddress,InstanceName:Tags[?Key=='Name']|[0].Value,Status:State.Name}" --filters Name=instance-state-name,Values=running --output text ; echo "------------------------------" ; sleep 1; done
Terraform 기본 사용법 -> 별도 포스팅
https://bravesunfish.tistory.com/80
[Terraform] 테라폼 기초 설명 & init 코드 구성 요소
Terraform 이란?- 하시코프사에서 공개한 IaC 도구- 블록에서 작성된 타겟 리소스에 대한 api 를 테라폼 프로바이더가 호출- 실행(apply) 하면 생성되는 tfstate 파일을 기준으로 상태를 비교하여 선언된
bravesunfish.tistory.com
Terraform 으로 EKS 배포
테라폼 배포 실행
> 테라폼은 디렉토리 기준으로 파일을 읽기 때문에 실행하고자하는 tf 가 있는 곳에서 실행

# 초기화
terraform init
ls -al
tree .terraform

# plan 확인
terraform plan

# apply 실행
terraform apply
 Enter a value: yes 입력

# ec2 생성 확인 : aws 웹 관리 콘솔에서도 확인 - 서울 리전 선택
export AWS_PAGER=""
aws ec2 describe-instances --output table

# 테라폼 정보 확인
terraform state list
terraform show
terraform show aws_instance.example

코드 파일 수정 > 반영 확인 : 태그 수정

plan 으로 변경 예정 값 확인 & apply 로 적용


첫 번째 EKS 클러스터 배포
# 코드 가져오기
git clone https://github.com/gasida/aews-cicd.git
cd aews-cicd/4

# terraform 환경 변수 저장
export TF_VAR_KeyName='peach'
echo $TF_VAR_KeyName

#
terraform init
terraform plan

# 10분 후 배포 완료
terraform apply -auto-approve
만들어 져야할 것 : VPC, Subnet, IGW, NATGW, Routing Table, EKS, EKS SG
state 파일 생성 완

확인
#
kubectl get node -v=6

# EKS 클러스터 인증 정보 업데이트
CLUSTER_NAME=myeks
aws eks update-kubeconfig --region ap-northeast-2 --name $CLUSTER_NAME
kubectl config rename-context "arn:aws:eks:ap-northeast-2:$(aws sts get-caller-identity --query 'Account' --output text):cluster/$CLUSTER_NAME" "Aews-Labs"

#
kubectl cluster-info
kubectl get node --label-columns=node.kubernetes.io/instance-type,eks.amazonaws.com/capacityType,topology.kubernetes.io/zone
kubectl get pod -A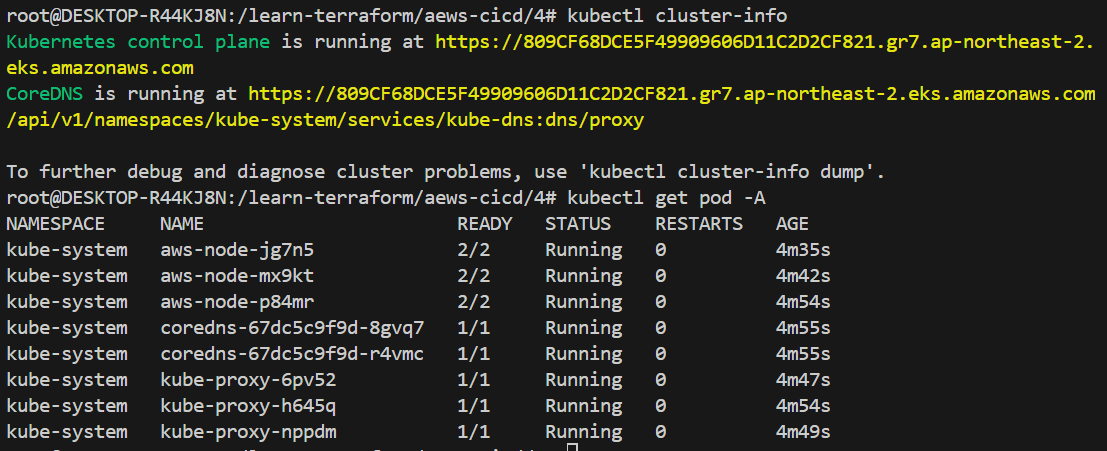

두 번째 배포 > 코드 재사용 검증
첫 번째 코드를 그대로 복사해서 myeks2 로 변수만 바꿔서 새로 apply 했으니 그대로 생성되는가 확인
#
cd ..
mkdir 5
cd 5
cp ../4/*.tf .
ls

#
terraform init
terraform apply -auto-approve -var=ClusterBaseName=myeks2 -var=KubernetesVersion="1.28"

# EKS 클러스터 인증 정보 가져오기
CLUSTER_NAME2=myeks2
aws eks update-kubeconfig --region ap-northeast-2 --name $CLUSTER_NAME2 --kubeconfig ./myeks2config

# EKS 클러스터 정보 확인
kubectl --kubeconfig ./myeks2config get node
kubectl --kubeconfig ./myeks2config get pod -A


'Infra & DevOps > Terraform' 카테고리의 다른 글
| [Terraform] 테라폼 기초 설명 & init 코드 구성 요소 (0) | 2024.04.25 |
|---|---|
| [Terraform] 테라폼 동작방식 (0) | 2022.04.15 |